hi
forUtech
how to guides & software tricks
Wednesday, 13 October 2021
Friday, 17 March 2017
How to create A Windows 10 recovery USB drive
Sometimes, when our computer got infected with viruses
and malwares, it stops working properly. This type of infections can corrupt
our operating system. So, if you keep a recovery drive of your Windows 10
operating system, it will be very easy to repair or reinstall your operating
system. In this post, you will learn how to create a Windows 10 Recovery drive.
I emphasis more on USB Drive than a CD drive because you can reuse your USBDrive if something goes wrong but this facility is not available is not available with CD or DVD drive.
If you face any problem with your windows 10 operating
system then you can use your USB recovery drive to repair or recover your
windows 10 operating system. You should note that once you plug your USB drive
to make a Windows 10 Recovery drive, all the data of your USB drive will be
wiped. So, I will recommend that use a newly purchased USB drive or a drive
whose data is not important for you. How much memory is needed depends on your
type of the system. If you are using a 64-bit system then it will definitely demand
more space than a 32-bit system. Generally a 64-bit system requires 16 GB or
more space. So, I suggest you to use a USB drive which more space than 16 GB.
However window will suggest how much space you need. If you are planning to
purchase a new USB drive then it will better to see first how much space is
suggested by your Windows 10 operating system. You will be able to know this
after reading the full post.
One important thing is that you should make recovery drive
before your system gets corrupted. Because it is said that prevention is better
than cure. Repairing a system without a recovery drive is a complex process.
There may be a easy process if you have access to another PC with Windows 10
that is working fine. You can make recovery drive through that PC and ca use in
your affected PC. But, it is better to make a USB recovery drive before you see
any problem in your system.
So, let’s start the step by step process by which you can
make a USB recovery drive easily.
Step by step process of how to create a Windows 10 recovery drive
you have to
follow the steps explained below:
- Go to “search the web and windows” situated in bottom left side of the desktop.
- Now, you have
to type “ Recovery Drive “ in the search box. Click on the search result “
Create a recovery drive”.
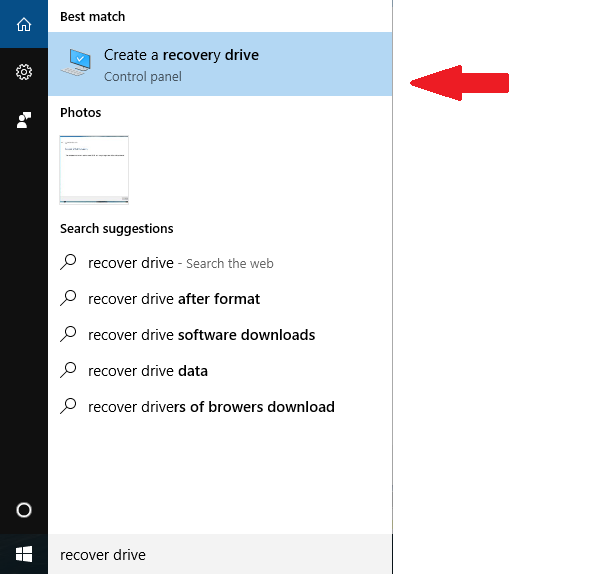
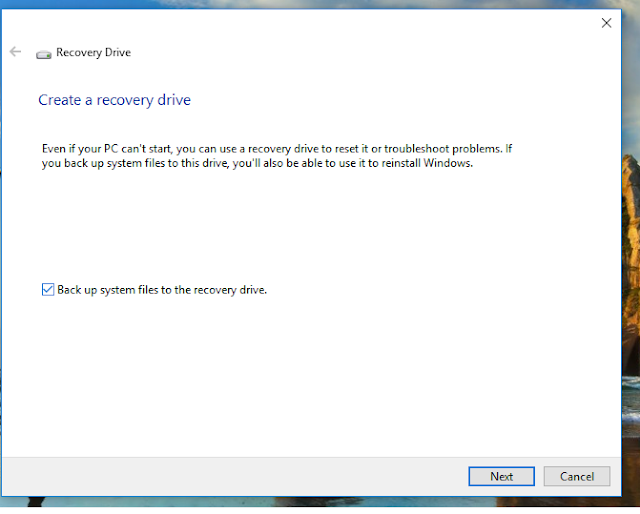
- A pop up window will appear which will say that its about to set up a recovery drive.
- Now tick mark the checkbox “ Back up system files to the recovery drive.”
- Click on “next”. Now, windows will calculate the space needed on your USB drive. Just wait for some time. After some time, you will see how much space is needed to make a recovery USB drive. Use the USB drive with space slightly more than this. If you are using a new USB drive then it’s ok. But, if you are using an old USB drive then it will be better to take a back up of the data of your USB Drive. Because, windows will wipe all the data of your USB drive.
- Now, plug in the USB drive and click on “Next”. It will take some time to create Recovery Drive.
That’s it.
You have made a Recovery USB drive for your Windows 10 operating system.
Tuesday, 14 March 2017
How to open or restore recently closed tabs in Google Chrome
It is very general phenomenon that while opening new tab
using Google Chrome browser we press on Cross button by mistake. It may be that
we are doing very important work in that tab. So recovery of that closed tab
becomes very necessary. Today I will discuss two methods by which you will be
able to open or reload the accidentally closed tab in Google Chrome.
Sometimes, we become so engaged in the work that we open
a lot of tabs in Google Chrome. But, when we accidentally close one of the tabs,
it becomes very hard to recognize which tab was actually closed. So, to save
your precious time and work just follow the below mentioned easy methods by
which you can restore your closed tab.
Methods to restore accidentally closed tabs in Google Chrome
First Method:
This method is very easy. You have two options. Either press
CTRL+SHIFT+T or just right click on the tab bar. A pop up menu will open.
Choose “Reopen closed tab” from this menu. You will see that a new tab will
start loading and that will be the tab you have closed accidentally.
You can also get the second last closed tab by again
pressing CTRL+SHIFT+T and so on.
Second Method:
Second method is also very easy. For this you have to
fetch your browsing history. Many of you already know how to fetch browsing
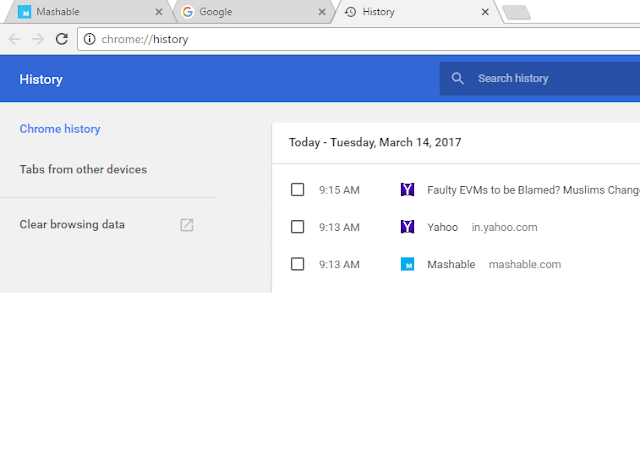
history. But for beginners, just press CTRL+H or type chrome://history/ in the
address bar of Google Chrome browser. Now, you can choose the closed tab from
the list you will see.
In this way you can easily open or restore recently
closed tabs in Google chrome.
Sunday, 5 March 2017
How to enable/turn on or Disable/turn off the On-screen Keyboard (OSK) in windows 10
Generally we use external keyboard for typing anything in
our PC. But, it may be the situation when your keyboard is not working properly.
In that situation a beautiful feature of windows 10 can help you. Windows 10
comes with a facility On-Screen Keyboard (OSK) which can be used by mouse and
if you have a touch screen then by any pointing device. When you will
open/enable On-screen keyboard in windows 10 then you will see a keyboard on
your PC with all the standard keys available in your physical keyboard. You can
easily use it and you can fulfill your purpose. So, it is very helpful when
your keyboard is not working.
6 Methods to enable/turn on the On-screen Keyboard (OSK) in windows 10
There are six methods by which you can easily enable /
turn on the On-screen Keyboard (OSK) in windows 10. We will discuss it one by one:
Method 1
Type on-screen keyboard in “search the web and windows”
option situated in left bottom position of your window and press Enter. You
will get an On-screen Keyboard (OSK).
Method 2
In this method we will open On-screen Keyboard (OSK)
through PC settings.
Step 1: At first
Go to start (windows icon) situated left in left-bottom of your window.
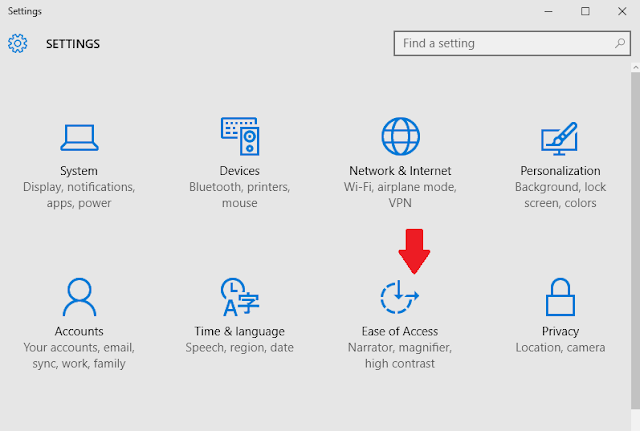
Step 2: then go to Settings > Ease of Access
Step 3: Now you have to choose Keyboard and move the
slider to On position.
Step 4: you will get an On-screen Keyboard (OSK) as
below.
Method 3
In this method you have to press “Windows + U “key
combination. > Start On-screen Keyboard.
Method 4
In this method we will open On-screen Keyboard (OSK) with the help of Command Prompt.
Step 1: At first
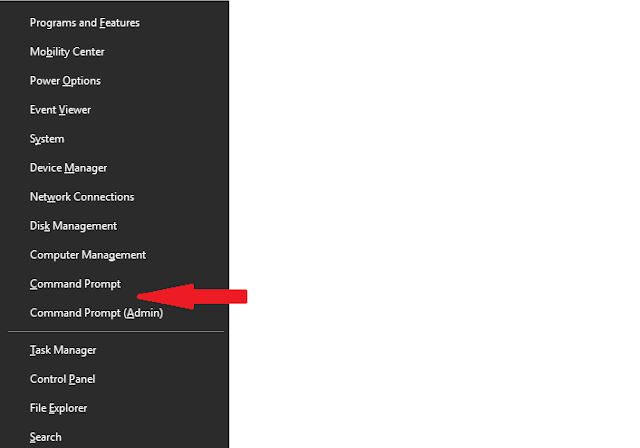
press “Windows + X “ key combination and click on command prompt from the
options.
Step 2: Type osk in command prompt and press Enter. You
will see On-screen Keyboard (OSK).
Method 5
In this method we will open On-screen Keyboard (OSK)
through “RUN “.
Step 1: Type RUN in search the web and windows option
situated in left bottom position of your window and press Enter.
Step 2: Type osk in “RUN “ dialog box. Now you will see On-screen
Keyboard (OSK) on your screen.
Method 6
Step 1: At first
Go to start (windows icon) situated left in left-bottom of your window.
Step 2: Type Windows Powershell in “search the web and
windows” option situated in left bottom position of your window and press Enter.
Step 3: Windows powershell will open. Type osk and press
Enter. You will get On-screen Keyboard (OSK).
How to Disable On-Screen Keyboard
Just like enabling, Disabling On-Screen Keyboard is very
easy.
Step 1: At first
Go to start (windows icon) situated left in left-bottom of your window.
Step 2: then go to Settings > Ease of Access
Step 3: Now you have to choose Keyboard and move the
slider to Off position.
In this way you can easily enable/turn on or Disable/turn
off On-screen Keyboard (OSK) in windows
10.
Friday, 24 February 2017
Learn step by step: How to appear offline/invisible on Facebook
Sometimes when you open your Facebook account, messages from
friends start flashing on the screen. No need to say that sometimes we do not
have mood to chat or chat with particular person. In any way, there arises the
need of the exciting feature of Facebook -“appear offline on Facebook”. You can
be online on Facebook but people will think that you are offline. In this post,
I will discuss “How to appear offline on Facebook” step by step.
When you will open your Facebook account, you will see that
green indicator shows that you are currently online. In this way your friends
understand that you are online and they start sending messages. Some are good
but some messages will be definitely unwanted. But, using the Turn off chat
feature you can pretend to be offline for them. In this way, you will be
invisible for them.
You can be offline by using turn off Chat feature of
Facebook. By using this feature, you can be offline in three ways:
- Offline for all the friends.
- Offline for specific friends.
- Offline for all friends except some friends.
This “Turn off Chat “facility is available for both Desktop
and Mobile versions of Facebook. But, there are some differences in both
versions. In desktop version, you can appear invisible in all the above three
ways that means offline for all the friends, offline for specific friends and
offline for all friends except some friends. But, in mobile App version of Facebook
you have only one choice is either be online for all friends or be offline for
all friends.
We will first discuss methods for Desktop version then for
mobile app version.
For Desktop: How to appear offline/invisible for all Facebook friends
Step 1: At first open your facebook account.
Step 2: Now, you have to click on Settings Gear Icon
situated in your sidebar of facebook chat.
Step 3: Just select “Turn off Chat”.
Step 4: you will see a popup window. You have to choose “Turn
off chat for all friends” from this window.
Step 5: Now click on the “Ok“button situated at the bottom of
this popup window.
For Desktop: How to appear offline/invisible for specific friends
Step 1: At first open your facebook account.
Step 2: Now, you have to click on Settings Gear Icon
situated in your sidebar of facebook chat.
Step 3: Just select “Turn off Chat”.
Step 4: you will see a popup window. You have to choose “Turn
off chat for only some friends...” from this window.
Step 5: you will see a box below “Turn off chat for all
friends except...”
Step 6: Now you have to enter the name of the friends for
whom you want to be offline.
Step 7: Now click on the “Ok“button situated at the bottom of
this popup window.
For Desktop: How to appear offline/invisible for all Facebook friends except some friends.
By choosing this option you will be online for certain
friends and appear offline for all other friends.
Step 1: At first open your facebook account.
Step 2: Now, you have to click on Settings Gear Icon
situated in your sidebar of facebook chat.
Step 3: Just select “Turn off Chat”.
Step 4: you will see a popup window. You have to choose “Turn
off chat for all friends except..” from this window.
Step 5: you will see a box below “Turn off chat for all
friends except..”
Step 6: Now you have to enter the name of the friends for
whom you want to be online.
Step 7: Now click on the “Ok” button situated at the bottom
of this popup window.
For Mobile App: How to appear offline/invisible
Step 1: At first open your facebook Messenger App.
Step 2: Now tap on the three horizontal lines of you Facebook
Messenger App.
Step 3: Select “Active “tab.
Step 4: Fix the slider to “Switch Off” situated in front of
your name.
In this way you can appear offline/ invisible on facebook .
One important thing you should remember that after selecting “Turn
off chat” you will be invisible for the friends but similarly your friends will
also become offline for you. You will not be able to know that they are online
or not. So this feature has some advantage and at the same time it has some
disadvantage.
In this way, you have learnt from this article that you can
easily appear offline/invisible by following above easy steps for both desktop
version of Facebook and mobile App version (with some limitations). You can do
your work even being online on facebook without any disturbance from the
facebook chat messages. You can be offline by above mentioned three ways you can
be offline in three ways: Offline for all the friends, Offline for specific friends,
Offline for all friends except some friends. And in the mobile App version you
have only one choice is to be offline for all or to be online for all your
facebook friends.
Tuesday, 21 February 2017
How to remove password from PDF files using web browser
We use many password protected PDF files for security
reasons. But, when we use it in our own computer and we use it regularly then
using password each time becomes boring. So, I have an easy idea for you to
remove password from your PDF files using any web browser.
Remove password from PDF files using web browser
It is very exciting to know that your web browser can act as
password decryptor for your PDF files. You can easily remove password of PDF
file without any software. You have to follow these steps:
- Right click on the PDF file click on “ Open With “. Now, select the browser from the list.
- Now right click on the file and click on Print or just press “ CTRL + P “ .
- You have to choose the printer as “ Microsoft Print to PDF “ . Now click on “ Print “
- Now your file will be downloaded . This downloaded file will open without any password.
In this way you can easily remove password from PDF files using web
browser.
Sunday, 25 September 2016
How to use Google Translate as proxy
Generally colleges and schools block the social media and other websites which are not related to study.
people use proxy websites to visit those websites. Now, you can use google translate as a proxy website. but, there is only one limitation that it will not hide your IP address.
So, follow these steps:
- At first Go to the link : http://www.google.com/translate?langpair=es|en&u=www.mashable.com
- Now, you have to change www.mashable.com to website you like to visit. Suppose you want to visit Facebook then link will be like http://www.google.com/translate?langpair=es|en&u=www.facebook.com
- Hit the Enter button.
you have done this. Now you can visit the websites using google translate as proxy site.
You can visit the websites using this method. But, you can't hide your IP address by this method.
How to convert webpage into PDF file
Suppose if you like some article on any webpage and you want to study it offline, then you are at right place.
so you have to to the following:
- At first go to your Google chrome browser of your computer.
- Now, open the webpage you want to convert into PDF file.
- Just press "Ctrl + P" for windows operating system and "Command + P " for Mac.
- you will see a print dialog box. Now go to change destination as below pic.
- Change the destination and click on "save as PDF".
- Finally Hit on save button.
yes you have done this. now you can read this webpage offline. In this way, you can easily convert a webpage into PDF file.
Wednesday, 21 September 2016
How to stop automatic updates in Windows 10
windows 10 has come with some unique features. In some older versions of windows, we had choice to stop automatic updates. But, windows 10 automatically check and install the updates necessary for your system. This facility is good for the reason that this can save our system from errors and unfortunate attacks. But, for those who use limited data plan for internet usage, this is a nightmare. Their data exhaust very quickly. So, if you are among the persons who use limited data plan and do not want that windows 10 do automatic updates then i have some ideas for you.
you can stop automatic updates in windows 10. There are three ways for this. i will explain all the three one by one.
By setting your data connection as metered connection
windows 10 has come with a new facility by which you can set a connection as metered and it will stop using automatic updates. For this, you have to follow the steps mentioned below:
For Wi-Fi connection
- At first, open the settings app or just press Win + I
- Now go to "Network and Internet ".
- open "Wi-Fi"and click on "Advanced Options ".
- Now toggle "Set as metered connection to "On".
By Run command
- Press "Win + R ". it will open Run command. You have to type " sevices.msc". Now hit "Enter"button.
- Now find the "Windows Update " service . open it.
- go under "General "tab, find "Startup Type " ..Now, change it to "Disabled
- Restart your computer.
Using Group Policy Editor
This method is only for windows 10 Education, Pro, and enterprise edition. Windows 10 Home user can't apply this method.
- Press "Win + R ". it will open Run command. Type "gpedit.msc". Now hit "Enter"button.
- Now go to Computer configuration > Administrative templates > windows components > windows update
- Open "windows update "and change the configure Automatic Updates setting to "Notify for download and notify for install ".
- Press "Win + I "to open settings app and go to Update and security > Windows updates. Click on "Check for updates ". now, your new configuration will apply.
- Restart your computer.
Monday, 22 August 2016
Sunday, 24 July 2016
How to factory reset in windows 10
In this post you will learn how to factory reset windows 10. Sometimes we see some problems in our operating system and we fail to recognise the reason of the problem. In this case, factory reset may help you.
SEE ALSO : HOW TO KNOW WIFI PASSWORD IN WINDOWS 10
Saturday, 23 July 2016
Subscribe to:
Comments (Atom)
